Canelé de Bordeaux are wonderful. Technically, since I’m not a member of the ultrasecret club of Bordeaux pastry chefs, I have to legally refer to them as cannelé (two n’s).
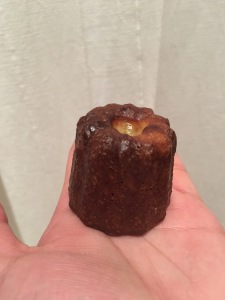
If you’ve ever had a great cannelé, you might be wishing you had one right now. If you don’t know what a cannelé is, imagine a world where desserts run amok and the creaminess of a flan has a love child with the crackly, glassy exterior of a crème brûlée. No matter how many times you have it, the first bite of a cannelé seems to always be startlingly crunchy. Once you reach the middle, there is an aromatic veil of rum and sweetness that coats the palate. If it was made correctly, the semi-bitter notes of caramelized sugar and floral notes of the beeswax should be the last taste in your mouth. Throw in a frustratingly short shelf life (3-4 hours) and, all together, a cannelé is truly a tragically beautiful pastry.
Between October-December 2017, I made cannelé 3-4 times a week. In doing so, I’ve read every online article and watched every video I could find. I’ve tried all of the most promising recipes, sometimes repeating them and getting different results each time. I’ve cursed at YouTube chefs under my breath because their “foolproof” instructions didn’t produce results as advertised. Despite my neuroticism, I’ve also made some embarassingly awful mistakes; one batch was unpalatable because I had mistakenly used salted butter to grease the molds instead of unsalted butter. Another batch I experimented with coconut oil to grease the molds only to find out that the smoke point of coconut oil is 250°F (my final recipe has a bake temperature of 550°F). By the time I realized what was happening, my oven was basically on fire and I had infused my house furniture with the smell of rancid coconut oil. I’ve burned my fingers with hot copper, a propane blowtorch, and hot boiling beeswax. I have burnt sugar so severely onto my copper molds that I had to sit with a wooden chopstick for an hour trying to scrape off stuck burnt bits. After dozens of tries, I am happy to report that I now have a reproducible, albeit, fussy recipe. Full disclaimer: I have yet to try this in someone else’s oven but I feel like there shouldn’t be too much variation as long as the temperatures can be confirmed with an oven thermometer. The wonderful and cursed cannelé is, without a doubt, the most difficult thing I’ve ever had to make in the kitchen.
At the end of this post is my personal cannelé recipe. It is fussy and a over the top, but I believe all the steps are necessary for a home cook to bake a reproducible cannelé. I also believe this recipe solves ALL of the major problems reported by other bakers such as: overwaxing (excessive wax droplets formed in the interior of the pastry), “white ass” (pale uncooked area in the middle), excessive rising during baking (see Chez Pim recipe link), carbonized bitter exterior, and difficult releasing from the molds.
So here is my cannelé story. I wrote this not to intimidate you but to educate you on everything I know so you, intrepid reader, will not have to traverse the internet high and low like I did.
***
Hand to God, there are some seriously awful cannelé in Paris. Yes, I realize this is a Bordeaux staple and since I’ve never been there before, I’m unclear how good an “authentic” cannelé really is. In Paris, however, many cannelé are sold at the open air markets full of cheese and farmer’s fruit. These cannelé were the absolute worst of the worst and barely palatable — no better than a squishy brown bundt cake. Logic goes that if a good canele is only going to last 2-3 hours, there’s no reason why an outdoor vendor with no oven would be able to sell a good one at 2PM in the afternoon. Finally, on attempt number 5 or so, we had a wonderful one at Pierre Hermé. My fate was sealed.
If you’re here to just get the recipe, skip to the end. But if you are interested in any of the theory that goes into baking a cannelé, there are a few topics to cover. If you’re a fan of Kenji Lopez-Alt or anything food science related, I’d encourage you to read the entire post which will cover all the main “talking points” with the recipe in the following order:
- Buying the Copper Molds
- Seasoning the Copper Molds
- The Batter
- The Butter (inside and outside)
- The Beeswax
- The Bake Temperature and Heat Quality
- The Flavor and Texture of the Cannele
- General tips, pitfalls and observations
- The Recipe
1. Buying the Copper Molds
First of all, my recipe is for copper molds. Yes, copper molds are pricey. Yes, they are fussy. But, when it’s clear that the best cannelé in Paris and New York City all use copper molds, I wanted to play pro-ball with the big boys. I’m certain my recipe of ingredients could be adapted for silicone molds with some different temperature settings. Keep in mind, though, that most oven safe silicone is only bake-safe up to 450°F so I don’t think 550°F would be a good idea. If you have silicone molds, I would suggest trying out this Saveur recipe by Niko Triantafillou.
If you are looking to buy some copper molds, there are many options to buy them state side. I’d recommend at least 6 molds, but I think 12 would be better. Here are a few links:
- Williams Sonoma – Mauviel. These look wonderful. I would recommend the largest size. At the time of this post they are $184.95 for 6 (approximately $31 each).
- Amazon – Mauviel. I believe these are the same molds sold on Williams Sonoma site for about $29 each on Amazon.
- Amazon – Unknown brand. These are currently out of stock but go for $65-80 for a set of four. Early reviews seem promising.
I decided to purchase my molds in Paris at:
E. Dehillerin
18 Rue Coquillière
75001 Paris, France

If you are trekking to Paris, I recommend a visit here. E. Dehillerin is a 200 year old cookware shop that is popular with the gastronomically minded Parisian traveller, but for those who are unaware, it’s a historic cookware shop with connections to Bocuse, Robuchon, and Julia Childs, among others. Their inventory ranges from inexpensive pastry scrapers to copper pots that come close to 1000 euro. I almost bought 55 euro ($68) wooden fish spatula until my wife just shook her head disappointingly at me. I have since bought a similar fish spatula for $2.00 USD. God bless Amazon.
At E. Dehillerin, there were 3 sizes of molds. The smallest was about 1 inch tall (think quail egg). The medium size was about 1.5 tall (table tennis ball). The largest was 2 inches tall, or about the size of a medium egg. I chose the largest, most classic size. Because of the relationship between surface area and heat, I figured it would be easiest to understand existing recipes in the context of the standard cannelé mold. Perhaps one day, I’ll go back for the small ones since I think the mixing up the ratio of crispy shell to creamy interior might be interesting. After Euro to USD conversion, 12 molds cost $270.82 with tax. After the VAT tax rebate at the airport (applicable for any purchase over 175 Euro at 1 store), the total cost was $270.82-37.50 = $233.32, or $19.44 per mold. The molds were given to me wrapped in paper with no box, no tags, and no labels. I don’t know who makes them but the shop clerk assured they were made in France. They are lined with tin and look similar, but not identical to Mauviel molds sold by Williams Sonoma. The molds are hefty and I took them as a carry-on item on the plane ride. Not surprisingly, I got pulled aside and searched at every possible security checkpoint with an x-ray machine. I’ll never forget my lively discussion with a TSA agent about cannelé while he frisked me for contraband. After 3 months of use, my only gripe is that I’ve noticed that the tops of my molds are more rounded than I would like. Pictures of cannelé from Bordeaux shops seem to show more angular fluting on the pastry so I think the molds must be different. It’s a trivial detail but I wonder if the more fluted ones might have more surface area and therefore a little more crunch. “Triangles taste better,” anyone?
2. Seasoning the Copper Molds
The molds are squeaky, clean, and dry when purchased new. In order to use them, they need to be seasoned or you will suffer the wrath of smoke, carbon, fire and brimstone after your first round of baking.
Mauviel recommends the following: Melt pure beeswax. Pour the wax in and out quickly to coat the interior surface and bake at 400°F for 10 minutes then turn it upside down to drain. Allow to rest until cool.
When I first brought the molds home, I didn’t have beeswax so I used vegetable oil and baked it for 20 minutes at 400°F. This didn’t work wonderfully well but eventually after 5-6 rounds of baking, they became progressively more nonstick, but were never perfect. After one single round with beeswax, they instantly became perfectly seasoned. I’d recommend saving yourself the headache and going straight to beeswax.
3. The Batter
As Mr. Triantafillou says in his Saveur article, virtually every aspect of the cannelé recipe is up for debate. If you read through the hundreds of recipes available online, most recipes are eerily similar to each other and I can attest after trying at least 5 wildly varying recipes (confectioners sugar vs regular sugar, no corn starch vs corn starch, egg white vs no egg whites), that the ingredients matter a little bit but not as much as you might think. The only way to capture the “essence” of a cannelé, in my opinion, is to maintain good quality heat and with cooking technique. The magic of this process is that cannelé batter is nothing more than a very accurately measured pancake batter (milk, butter, eggs, vanilla, flour, sugar, corn starch, salt… and rum).
That being said, let me offer a few thoughts on what I think yields a better quality batter. First, if you think about the physical property of batter, I don’t think there’s any truth to the the theory that combining them a certain way yields specific advantages. I think that as long as the batter is not clumpy, you’re good to go. Also, I add the liquor (dark rum) after the heat has been applied because I don’t want to evaporate any of the alcohol and ruin the nuanced flavors of dark rum.
Next, I found that using confectioners sugar instead of regular sugar produced a gummy and mochi-like interior. I can’t be sure but I suspect this was caused by the corn starch component in the confectioners sugar. For example, a promising recipe from Bruno Albouze recommended 30g of corn starch (which is nearly 10% of the dry weight ingredients) and, for me, produced a custard that was too pasty/gummy for my liking (think the lower half of a excessively wet-and-gummy banana bread). Editors note: Bruno’s recipe was especially intriguing because he claimed that his recipe reportedly comes from his days as pastry chef in Bordeaux at the canelé (one N, y’all) specialty shop Baillardran.
4. The Butter (inside and outside)
The butter in the batter should be whole butter (comes in sticks). Any brand will do. The butter for greasing the inside of the copper molds, however MUST BE CLARIFIED BUTTER. I cannot stress this point enough. If you use regular butter, your cannelé will burn on the outside. The reason for this is that whole butter (in a stick) is made of: 80% fat, 20% water, 1% milk solids. When you take whole milk and boil off the water and strain out the solids, you get pure butter fat, or clarified butter. The resulting product has as much higher smoke point and longer shelf life (does not need to be refrigerated). It is easy enough to make but adds an unnecessary and messy step to this already-too-complicated process. Instead, you can buy ghee from your local health shop or Whole foods. Now yes, all you master chefs-nerds out there are muttering that ghee is a “type” of clarified butter and is simmered a little longer to produce a nuttier taste, but after 1 hour in the oven at 550°F, I’m fairly certain the differences between ghee and butter are undiscernable. The brand I purchased was Fourth and Heart and I’ve been happy with the results so far. I only use 20-25g at a time per batch of 12 cannele, so a jar of 250g should make 100-120 cannelé easy.
5. The Beeswax
Trying to find “food safe beeswax” is much harder than one would think. As weird as it sounds, beeswax is in all kinds of things (lotion, lip balm, chocolates, candy corn, Haribo gummy bears, etc). My first trip was to Sprouts Farmers Market and I learned that they did carry it — so I purchased a 5 oz. bar of TruMelange “pure beeswax” for $10. I called the number for TruMelange customer support and there was a very fiesty service representative who was very defensive and told me to absolutely not use it for food. Needless to say, that didn’t inspire confidence so I gave it to my wife so she could turn it into a candle. I then contacted a local honey producer on Facebook and he said his product was 100% natural but it will likely have bee parts like legs and wings but it is “as natural as you could ask for.” As much as I love 100% natural, I didn’t want to wonder if the crunchy exterior would be because of perfect technique or unintentional insect protein. I knew I’d have to filter it myself, so I watched about 10 YouTube videos about how to process and filter beeswax and called him back to say, “No, thank you.”
Then I remembered on Amazon, it suggested that people who buy cannelé molds also typically bought this organic beeswax made by Hansi. I also remembered that I’ve seen pastry chefs cook with beeswax pellets before and I found this Amazon Choice product by Sky Organics (USDS organic yellow beeswax). Since these are all cosmetic grade and safe for lip/balm and since I prescribe transdermal medication for a living, I figured anything safe for skin is probably food grade.
While I was debating about these, I found a package of filtered beeswax at Whole Foods sold by Hilltop Gardens, LLC in Oklahoma.
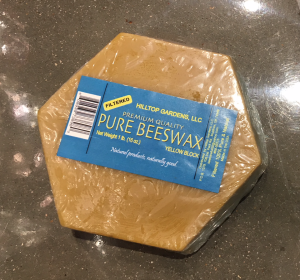
I emailed the address on the package while I was shopping and I got a reply within 10 minutes:
Good afternoon,
The wax we sell is nothing but pure strained bee wax. There are no additives in it. I am not familiar with cooking with bees wax but if u can use just raw wax this is what it is.
JD Hill
Well, JD — that’s good enough for me. The 1 lb brick cost about $15 and I use about 20 grams per batch of 12 cannelé. I expect this will last me about 20 batches or maybe 250 cannele or so. I think once I’m done with this batch, I will try this option from Bees Wax Co. in Dripping Springs, Texas. Some bakers believe that wax from farmers will always taste better than the stuff in commercial nameless packages.
1. The Beeswax Co (1 pound for $17 – their website)
2. The Beeswax Co (1 pound for $22 – Amazon website)
6. The Bake Temperature and Heat Quality
Bar none, the most important aspect of the cannelé recipe is the quality of the heat. Based on my experience, I believe that all common problems like “white ass” and over-lifting can be solved with temperature settings and a baking steel. Most of the recipes in English specify maximum temperatures of 375-450°F. A few French recipes on blogs (thank you Google Translate) suggest temperatures closer to 300-325°C range which converts to 550-600°F. If you read about the origins of the canelé (one N), the molds were sometimes set directly on coal fires which probably burns over 1000°F.
Using this information, I used this oven thermometer and confirmed that my oven does in fact reach a maximum temperature of 550°F. I also realized that even after the pre-heat oven beep, it took an additional 30-40 minutes of heating to reach that temperature. I also remembered this fantastic post from Kenji about pizza stone vs. steels. Making a cannelé is all about delivering heat quickly to the batter as efficiently as possible and there are many of similarities between baking a crispy neapolitan pizza and crispy cannelé. Here is an excerpt from the post that explains the key point:
A [pizza] stone in a 550° oven will stabilize at around 500 to 525°F […] The steel, on the other hand, stabilizes at around 450°F (though in some tests it peaked at closer to 500°F). This is due to the steel’s radiative properties. It’s constantly giving off heat even as it absorbs it, causing it to stabilize at a temperature that’s slightly cooler than the air around it. I measured the air temp in my oven with a dry bulb thermometer that registered between 500°F and 550°F, depending on the oven’s cycle.
Now you may be thinking, wouldn’t a lower floor temperature lead to longer cooking times and therefore an inferior pizza? The answer is no, and it has to do with the relative conductivity of the two materials. Even though the steel is cooler than the stone, it is far superior at transferring its energy to whatever is placed on top of it than the stone, which more than accounts for the lower temperature. It’s the same principle that allows you to stick your hand in a 212°F oven, while sticking it into a pot of boiling 212°F water would scald it.
-J. Kenji López-Alt
Physics, y’all! Based on this logic, I bake all my cannelé on a foil-lined baking sheet (to catch wax drippings), which is then placed on a large baking steel that is in a 550°F oven that has been preheated for 45-60 minutes. I believe doing so produces more efficient heat transfer and has eliminated “white ass” and also sets and “sears” the crust in a mechanical way which prevents the batter from lifting more than 7-8mm from the level of initial batter pour.
7. The Flavor and Texture of the Cannelé
There is little argument that the basic recipe includes: milk, butter, vanilla, liquor, flour, sugar, salt and commonly, corn starch. I’ve seen some variations that incorporate twists like chocolate, green tea, or different liquors such as Baileys, coconut rum, or cherry flavored Grand Marnier. There are also some savory ideas out there like cheese, chorizo, and olive. For now, these sound more weird than delicious. If you insist on variation in your life, the ChefSteps website about cannelé is a great place to get started, but it reads like a schizophrenic and you can tell there are many technical problems with the recipe like excessive rising of the bottom and lots of pictures showing tops with “white ass.” Sorry Grant. I also disagree with a few of their conclusions like wax not making a difference and using lower baking temperatures.
As for cannelé texture, I noticed that the ingredient that affects the final texture the most is the amount of corn starch in the recipe. As I mentioned before, Bruno Albouze’s recipe used nearly 10% dry weight of corn starch (30 grams) and this created an attractive, lacy interior with small pockets of air but it wasn’t light and custardy. Instead, it was pasty and sort of “spreadable” like a wet banana bread or a Latin style flan. The one time I used confectioners sugar, it came out even MORE pasty and I’m guessing this was due to the variation there is in some brands of confectioners sugar. After experimentation, <2% dry weight corn starch (7g) seemed to yield the best results.
8. General Tips, Pitfalls, and Observations:
I’m going to share some pictures from my early batches and describe what went wrong. Don’t be afraid of failing — these were delicious too and if you have a small child or dog, they will happily eat your mistakes away. At the end of these pictures, I’ll include shots from what a successful batch is supposed to look like.
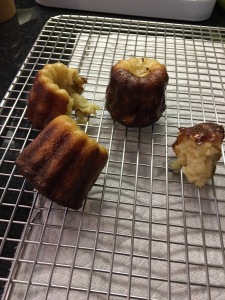
This one was a combination of two batches. The three left most: batter using confectioners sugar, canola oil to grease the molds, no beeswax, 450°F bake times for 55-60 minutes. The sad litter blunder on the right was from an earlier batch that evening where I accidentally used salted whole butter to grease the mold and that resulted in a burnt carbonized layer that I had to scrape off cannelé chunks with a chopstick.
This one looked ok but wasn’t very good. I’d give it a C minus. The problem with these batches were that the bottom edge and underside of the cannelé (exposed to direct heat) was burning too much and the top was not cooking enough. I solved this by switching to clarified butter on the mold so the milk solids wouldn’t burn so quickly. After adjusting temperatures, I also started putting the baking sheet on top of a pizza steel and the “white ass” problem went away forever. There was also no wax on this one.
Aside from some slight white ass, this one turned out OK, but not great. I’d give it a B minus. This cannelé was standard recipe, beeswax and butter coating, 500 degrees for 10 minutes and then 40 minutes with only baking sheet and no pizza steel. Recipe was good but there was insufficient heating.
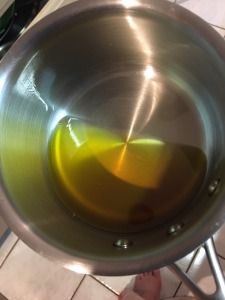
Clarified butter and pure beeswax mixture. I personally would just get an inexpensive small 1 quart pan for this. Depending on the color of your beeswax, the oil mixture will be amber or pale yellow. Most standard recipes have a 50% wax + 50% butter ratio. Some suggest a 40% wax and 60% butter to thin out the oil a little. I tried this a few times and there wasn’t much difference in the final product except a nearly imperceptible less of a crunch (maybe in my head?), but it was enough to convince me to go back to 50/50. The picture shown is a melted mixture of 25g beeswax and 25g clarified butter/ghee. This small amount is enough to grease 12 molds with approximately 20% extra remaining. If you have less than that, you’re probably using too much wax. If you have more, you’re probably using too much. If you do 20g wax + 20g butter you should nearly use it all up but it’s harder to portion out near the end so I always melt a little extra. A quick note about using bees wax: The melting point is about 141°F (61°C), and the fruity aromas will start disappearing when you heat it over 194°F (90°C). Just remember, gentle heat is good heat.

After baking, there will be waxy grunge in the molds and I use gloves and paper towels to wipe away as much as possible. I don’t obsess over perfect molds so even if they are a little dirty (as long as they are smooth with no old burnt bits), it is just fine. Do not use metal utensils inside the mold. You will damage the tin.
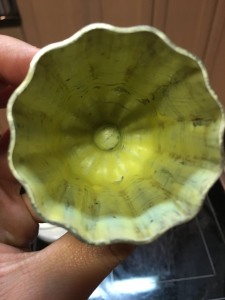
Here is an appropriately greased cannelé mold.

Another viewing angle of a waxed mold. Make sure the wax coating is thin. If it’s too thick, your cannelé will be gross. To undo the error, you should put the mold open side down on a wire rack and torch it at medium flame for 2-3 seconds with a blowtorch. Don’t touch the mold because copper is an insanely good heat conductor and it will be hot. In a second or two, the the wax will drip down out of the mold. If this doesn’t work, repeat the blowtorch flash again. Once the wax has dripped out, let it get back to room temperature (4-5 minutes) and try to grease the mold again.
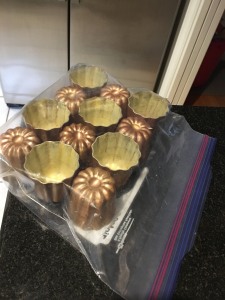 This is how I store the molds in the freezer after they have been coated with wax. You can keep it this way for weeks/months.
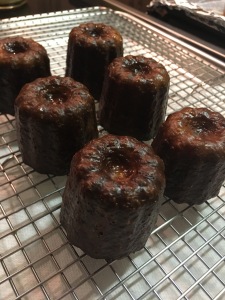
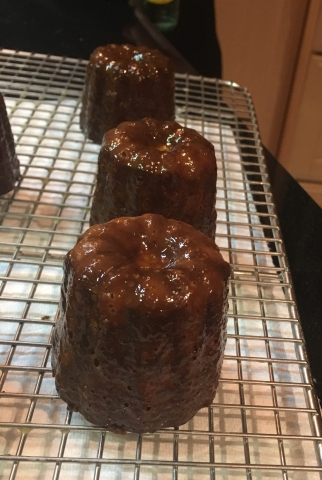
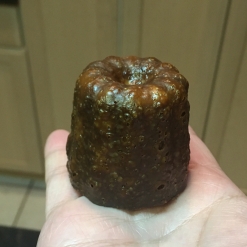
This batch was a little too blackened for my taste but otherwise it was a solid outcome with my master recipe batter, and proper bake temperatures. If you read my recipe, my recommended bake time is 550°F for 13 minutes followed by 375°F for 45 minutes. This picture was taken with a batch that went in for 550°F for 14.5 minutes and 375°F for 45 minutes. It really is shocking than an extra 90 seconds of high heat could turn it so black but it was slightly too bitter for me but possibly OK for some palates.
9. The Recipe
***
Cannelé Recipe for Copper Molds
Makes about 12 cannele for 2″ copper molds. Minimum prep/bake time is 4 hours with 1 hour of active time, but final results are better if the recipe is prepared over 4-5 total days.
Minimum necessary time:
15 minutes to prep batter
1 hour minimum rest time for the batter (for best results, you should rest for at least 4-5 days)
15 minutes to prep butter/wax mixture
2 hours to freeze molds
45 min oven preheat time
1 hour bake time
1 hour cool time
Wet:
500g whole milk
50g unsalted butter
1 vanilla bean (or 5g vanilla extract)
40g dark rum (can also use mixture of 20g rum + 20g grand marnier)
4 egg yolks (about 80g, but 75-90g is fine)
Dry:
120g all purpose flour
205g granulated white sugar
7g corn starch
1g kosher salt (large pinch about size of corn kernel)
For coating the molds:
25g Beeswax
25g Clarified butter or ghee
Note: There will be approximately 1/4 of the liquid oil left after waxing 12 moulds. If you want to be limit waste you might be able to get away with 20g + 20g.
Supplies needed:
Food scale
Food thermometer
Oven thermometer
Copper cannelé molds
Blow torch (to help melt and clean up errant wax drippings on random surfaces)
Fine mesh strainer
Natural hair pastry brush (sacrifice this for cannele forever since you won’t be able to get the wax out)
Small sauce pan to melt wax you won’t mind dedicating for canele forever
Heatproof gloves
Pizza steel (stone probably ok, but steel is strongly preferred)
Cooling rack
Lots of paper towels
Oven that will go up to at least 550°F (confirmed with oven thermometer)
New copper molds must be seasoned before use:
- Melt approximately 50g of pure beeswax (for 12 molds). Pour the wax in and out quickly to coat the interior surface and bake at 400°F for 10 minutes then turn it upside down to drain. Allow to rest until cool.
- Do not wash molds with soap. Do not use abrasives like steel wool or green sponges. If you must pick away at debris, use a wooden chopstick and not anything metal that could damage the copper or tin-lining.
- If after a round of baking, the molds have charred bits that are not releasing, bake at 550°F temperature for 5-10 minutes and the debris should carbonize and come off more easily.
- Allow to cool completely to room temperature before use.
Preparing the mold (must be frozen at least 2 hours but can be prepared weeks in advance):
- Melt equal parts clarified butter and beeswax in a small sauce pan (25g+25g).
- Once fully melted use a 1” pastry brush to brush a thin lining on interior surface of the mold. Don’t use a silicone brush; it won’t grab enough oil to apply it evenly. Be careful not to overheat your butter/wax mixture as this can destroy some of the floral notes of the wax. Also, be mindful not to let the mixture cool too much because it will not apply as thinly and you will get waxy chunks in shell of the cannelé.
- If you spill any wax or it drips anywhere, use your blowtorch to melt the wax (hopefully on a heat safe surface) and wipe it up quickly.
- Once all the molds are prepared, freeze molds for at least 2 hours. If you are planning to freeze many weeks or days in advance, I’d recommend placing them inside a plastic freezer bag and expelling as much air as possible to prevent ice crystals and frost accumulating on the insides of the mold.
Preparing the batter (ideally prepared 4-5 days in advance, but can be done 1-2 hours in advance):
- In a mixing large bowl, add flour, sugar, corn starch and salt. Combine well.
- Heat milk and butter in a saucepan to 185°F. Scrape vanilla bean and add the seeds as well as the pod (alternatively, add the extract.) Whisk gently to combine and turn off heat.
- Place 4 egg yolks into a mixing bowl and whisk to combine well. While mixing, add 10% of warmed liquid mixture to temper the egg yolks. Continue whisking while adding the rest of the hot liquid mixture. Then, add the liquor (rum +/- grand marnier). Remove the vanilla bean pod, if used.
- Add the dry mixed ingredients into the wet ingredients and using a whisk, combine until no dry ingredients can be seen. Strain the batter through a fine mesh strainer pour the batter into a clean mixing bowl. Cover with plastic wrap and refrigerate the batter for a minimum of 1 hour or up to 5 days. If you are resting for >24 hours, gently fold the batter once a day. Results are better after 4-5 days of resting the batter.
Baking the Cannelé:
- Place pizza steel or pizza stone on a rack. Preheat oven to 550°F. For my oven (radiant coil from the top), I placed the intended baking rack precisely 8-9 inches below the heating element. This resulted in a near perfect 550°F confirmed with oven thermometer. Continue heating for an additional 30-45 minutes after preheat cycle is done to ensure consistent heat throughout oven. Editors note: One time I baked the cannelé about 15 inches away from the heating element and the result was an epic souffle-like failure. Distance matters, people!
- Remove the waxed molds from the freezer and arrange them on a foil-lined baking sheet. I’ve made as many as 8 on a half sized baking sheet. I’ve made as many as 12 on a full size baking sheet. Make sure that the cannelé are resting on a part of the sheet that is on contact with the baking steel.
- Gently stir the cannelé batter so the density seems uniform throughout. There is usually a thick goopy layer resting on top that will “melt away” if you stir enough. Try not to incorporate any air into the batter.
- Strain the batter through a fine mesh strainer into a clean container.
- Pour cannelé batter into each mold, leave approximately ~8mm from the top of each mold. If you notice any air bubbles on the surface, quickly flash the top with a blowtorch the batters surface and the bubbles will pop. If you don’t do this, some of these bubbles with inflate and turn into a charred thin dome like on a neapolitan pizza crust.
- Try not to spill any batter on the baking sheet otherwise this will burn and smoke during the long bake times.
- Try your first bake with a small number of cannelé, say 2-4, to see what your oven can do first. If the results are good, you can increase batch size as long as your oven can retain its heat.
- Place sheet in oven and bake at 550°F for 13 minutes. NO MORE and NO LESS. When placing them in, try to open and shut the oven door quickly to prevent heat loss. At about 6 minutes into baking, you should notice some gentle bubbling on the surface of each mold. By 10 minutes, the bubbling should be very aggressive.
- At precisely 13 minutes, open the door and rotate the molds 180’ and drop the temperature down fo 375°F. You can relax about the oven door being open for too long since the temperature doesn’t need to be maintained high anymore but I wouldn’t keep it open for more than 10 seconds. Bake for 45 more minutes. My best results came between the 45-46 minute mark.
- Depending on your preference, you may want to increase the bake time to >47 minutes. As with during sugar into caramel, the last few minutes of bake time will result in exponentially higher risk of producing a dark brown, nearly black cannelé with unpleasant carbonized flavors.
- Remove the baking sheet and let the bubbling butter/wax mixture cool for 3-5 minutes. Using an mitt, hold and invert the molds on a wire rack and the cannelé should fall out easily. If not, you can thump it against a surface and it should pop out. If this doesn’t happen, you are screwed. I like to use a thin sliver of paper towel and wick up the wax that has collected in the top dimple.
- Let the cannelé cool for at least 45 minutes. They will only be extra crunchy for about 3-5 hours. They will still be a little crunchy 12 hours later but no where near as good.
***
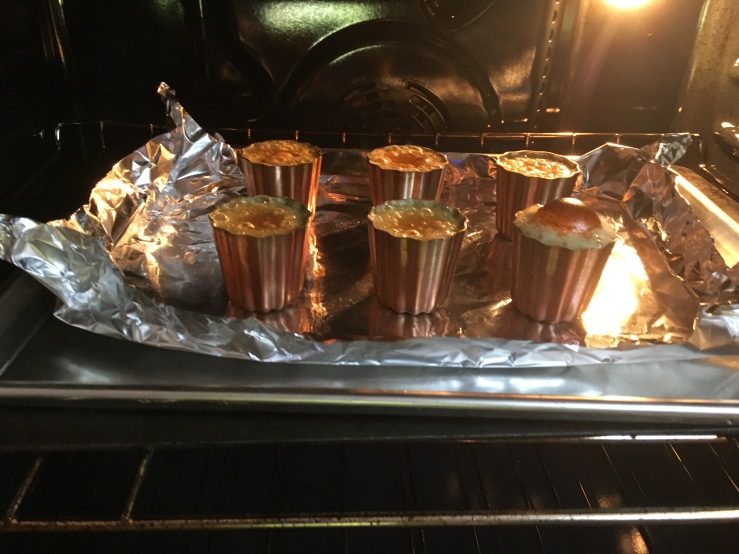 This is what the baking should look like after about 10 minutes into the baking process. The cannelé molds are resting on a foil lined baking sheet (to catch wax drippings). The baking sheet is placed on a large pizza steel that was preheated for nearly an hour prior to baking. The bottom right one is what happens when you don’t blowtorch flash the little bubbles prior to baking.
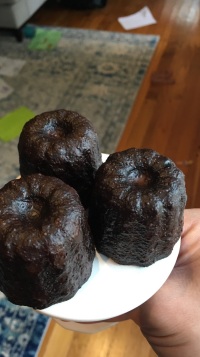
When the cannelé come out, they will look glossy, wet, and squishy. Over the next 30-45 minutes, they will dry out into a matte finish and turn crispy.
The bottom will always look more pale than the rest of the cannelé. This is how it should look.
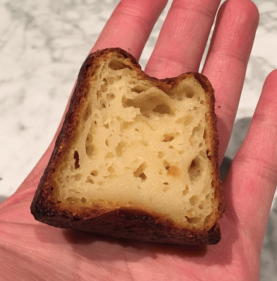
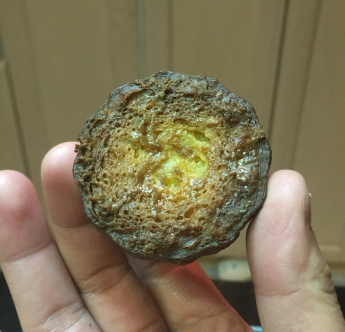
Lacy and custardy interior.
Et voilà. Cannelé de Bordeaux. Godspeed and good luck in the kitchen! If you follow this recipe, though, you won’t need luck.
